Wix Bookings: Creating a Multi-Day Service
4 min read
You can create one-time services that start on a specific day and run for several days in a row. This is perfect for multi-day seminars, workshops, guided tours, and more.

In this article, learn more about:
Creating a multi-day service that starts on a specific day
Start by creating a class or course and then schedule when it takes place.
Before you begin:
- Make sure to edit the hours for the staff providing this service so they are available 24 hours a day on the relevant days.
- To run a similar service in future that starts on another date, simply duplicate the event you created and set a new start date.
To create a multi-day service that starts on a specific day:
- Go to Booking Services in your site's dashboard.
- Click Add a New Service.
- Select Start from Scratch under Class or Course.
- Complete the General Info and Service Details sections with all of the necessary information about the service.
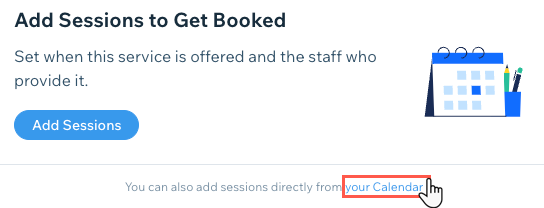
- Click Your Calendar under Add Sessions to Get Booked.
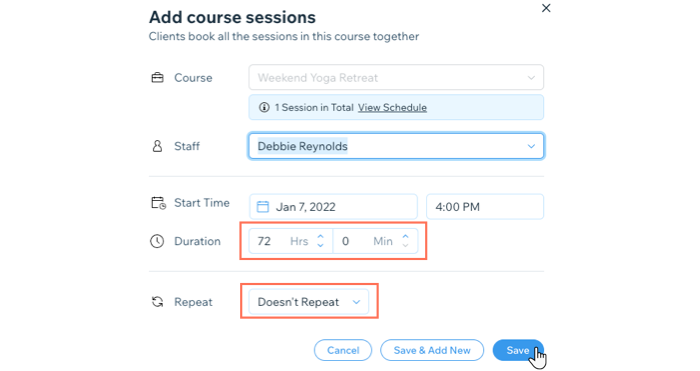
- Select the staff member in charge of the session.
- Set the start date and time.
- Select Custom from the Duration drop-down and set the number of hours the session lasts so it covers multiple days (up to 99 hours).
Note: To create even longer services you can schedule an additional session that starts as soon as the first one ends. Note that this appears as two sessions on your live site. - Select Doesn't Repeat.
- Click Save.
What's next?
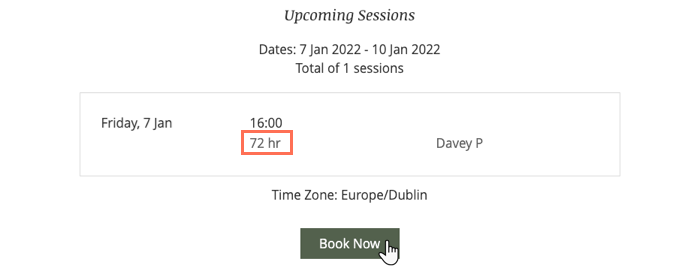
The dates and times you select then appear on the service page before your clients book.
Creating a multi-day service that's bookable at different times
You may want to create an appointment-style service that lasts more than one day. Clients can choose when they want the service to begin.

Before you begin:
Make sure to edit the hours for the staff providing this service so they are available 24 hours a day on the relevant days.
To create a multi-day service that is bookable at different times:
- Go to Booking Services in your site's dashboard.
- Click Add a New Service.
- Select 1-on-1.
- Enter a service title in the General Info section.
Tip: It's a good idea to mention the number of days in the service title to avoid confusion. - Complete the rest of the General Info section.
- Set the duration in the Service Details section:
- Select Custom from the Session Duration drop-down.
- Enter the length of the service (e.g. 72 hours).
- Finish creating the service and click Save.
Creating an appointment that runs past midnight
To offer an appointment that runs past midnight, you can customize your business's default hours and/or your staff members's hours. For example, your clients can then book a 4-hour appointment that starts a 9:00 PM.

To create a service that runs past midnight:
- Change your business's default hours:
- Go to the Appointment Hours section of your site's dashboard.
- Select the checkbox next to the day(s) you offer the service.
- Enter a start time.
- Enter your end time (e.g. 2:00 AM)
- Click Save.
Note: The staff member who provides the service must also be available during the relevant hours.
- Change your staff member's hours:
- Go to the Staff tab in your site's dashboard.
- Hover over the relevant staff member and click Edit in the top right corner.
- Do one of the following:
- Select Same as Default Hours to make the staff member's hours the same your business's default hours.
- Select Set staff member's hours to make the staff member's hours different than the business's default hours.
- Select the checkbox next to the day(s) you offer the service.
- Enter a start time.
- Enter your end time (e.g. 2:00 AM).
- (Optional) Add an additional time period for the same day:Click the + icon.
- Enter a start and end time. (e.g. 4:00 PM - 7:00 PM).
- Repeat for all other work days.
- Click Save.
Did this help?
|