Wix Blocks API Reference (Beta)
5 min read
Note
This product was a limited beta (2018) and will soon be outdated. See our updated help articles to learn more about the redesigned upcoming Wix Blocks workspace.
API Overview
You can add to Widget functionality using the Widget API. This API can only be used in front-end code. You do not have to import the API.
By default, the Widget API includes a single object and two methods, which are described on this page. You can also use the Widget API to expose properties, events, and functions in the Wix Editor.
Site designers can access the Widget API properties in the Settings panel. They can also use the API’s properties, events, and functions in the code for their site. Functions and events are recognized by auto-completion in Velo by Wix, and the descriptions you provide are displayed.
As the widget designer, you should provide documentation for your Widget API. This API consists largely of what you add to it, so your documentation is essential to enabling site designers to make use of it.
Velo by Wix for widgets
Use Velo by Wix to enhance widgets. Velo enables sophisticated control, esthetic finesse, and creative functionality in your widgets. Learn more about Velo by Wix here.
props
$widget.props is an object that contains the properties you add to the widget. The site owner has access to those properties in the widget’s settings panel and in Velo by Wix.
To add a new property, in the Widget API pane, hover over PROPERTIES and click . The properties you add become part of the $widget props object. In Blocks they appear in the Widget API pane, and on a website they appear in the settings panel of the widget.
Learn more about Blocks properties.
To add a new property, in the Widget API pane, hover over PROPERTIES and click
. The properties you add become part of the $widget props object. In Blocks they appear in the Widget API pane, and on a website they appear in the settings panel of the widget.Learn more about Blocks properties.
Example
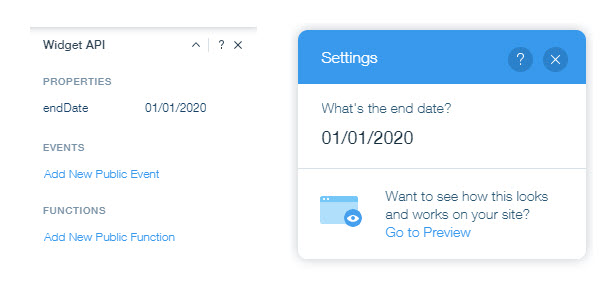
Take, for example, a countdown widget with text elements for days, hours, minutes, and seconds. You can see this widget on the examples page.
This widget has a property called endDate, to enable the site owner to set the date to count down to. You can see a usage of $widget.props in the countdown widget code:
This widget has a property called endDate, to enable the site owner to set the date to count down to. You can see a usage of $widget.props in the countdown widget code:
1function getTimeRemaining(){
2  const t = Date.parse($widget.props.endDate) - Date.parse(new Date());
3.
4.
5.
6}
Here are the Widget API pane and settings panel for the countdown widget:
onPropsChanged()
$widget.onPropsChanged adds a handler that runs when the widget's properties change. The handler accepts two parameters, oldProps and newProps.
Syntax
1onPropsChanged(handler: ChangeHandler)
2callback ChangeHandler(oldProps, newProps)
3$widget.onPropsChanged((oldProps, newProps) => {
4 < whatever you want to happen, code here >
5})
6                                               })
Example
In the stock widget example, we added a property called percentChangeThreshold, so that the site owner can decide to write code that reacts to a level of change in a stock price, as set by the user or in code.
fireEvent
fireEvent fires the event that you added to your widget. The event can pass data from the widget to be used in your code. Any code on the site which listens for this event will be triggered.
To add a new event, in the Widget API panel hover over Events and click .
.Syntax
1fireEvent('eventName',{eventObject})The event object contains the data passed with the event.
Example
In the stock widget example we added a changeAlert event that is triggered by a big percent change in the price of a stock. The event passes the percentChange variable. A website owner can write a function that triggers a specific response to the event, such as displaying text or sending an alert to a customer that includes the percent.
1//If the change is bigger than the requested trigger, trigger an event
2if(Math.abs(percentChange) >= $widget.props.percentChangeThreshold){
3    //$widget.fireEvent fires an event that can be handled with custom Velo by Wix JavaScript on the site
4    $widget.fireEvent('changeAlert',percentChange);
5   console.log('Fired OnChangeAlert with value of ',percentChange);
6
7    }
8}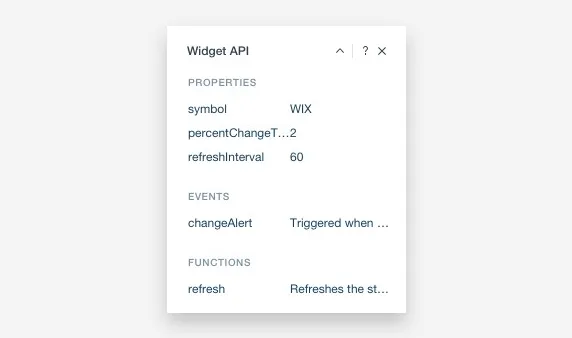
Events that you add appear in the Properties panel for your widget on a website. View the Properties panel by choosing Tools > Developer Tools > Properties Panel.
Here's an example of code that you could write for the site in the Wix Editor to make a text element called stockAlert appear when the changeAlert event fires:
1export function stockQuote1_changeAlert() {
2    //Add your code for this event here:
3    $w('#stockAlert').text = "Change in " + $w('#stockQuote1').symbol + "is greater than " + $w('#stockQuote1').percentChangeThreshold + "%"
4    $w('#stockAlert').show()
Adding and Using Functions
Add a new function to enable website owners more flexibility to perform actions related to the widgets on their websites.To add a new function in the Widget API panel, hover over FUNCTIONS and click . This uses JSDoc functionality in the code to add the function, a comment line on which you can add your description, and the parameters it uses to the Widget API. You’ll see this in your code:
. This uses JSDoc functionality in the code to add the function, a comment line on which you can add your description, and the parameters it uses to the Widget API. You’ll see this in your code:1/*
2@function
3@description Here is my description of my function
4@param {integer} myFunctionParameter - My description of what parameters the function requires*/
5export function myFunction{}Example
In the stock widget example there is a function that can be used on websites to control the widget refresh.
1/*@function
2@description Refreshes the stock quote*/
3export function refresh(){
4    //Call the stock API and process the resultS
5    getStockData();
6    //If there was a previous refresh timer, clear it first
7    clearInterval(refreshTimer);
8    //Set the new interval based on the timing defined in the property 'refreshInterval'
9    let intervalInMilliseconds = $widget.props.refreshInterval * 1000;
10    refreshTimer = setInterval(()=>{
11    //Call the stock API and process the results
12    getStockData();       },intervalInMilliseconds);
13}
Learn more about Wix Blocks from these articles:
Did this help?
|