Wix Editor: Adding Color and Gradient Backgrounds to Your Elements
5 min read
Create eye-catching, beautiful backgrounds for your elements with solid colors, gradients, or Fluid gradients.
In this article, learn more about:

Important:
Gradients are currently only available to add as a background to the following elements:
- Strips and columns
- Slideshows
- Repeaters
- Mobile menus
- Lightboxes
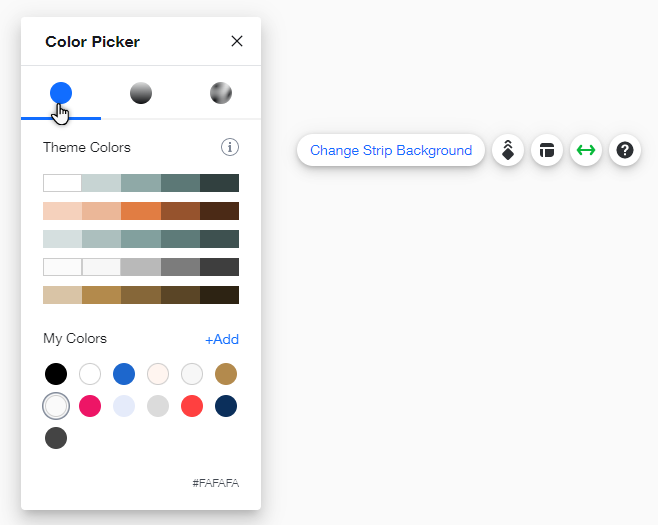
Adding a solid color to your background
Apply a single color to your background. Choose from your site's theme colors, your saved colors, or add a new one.
To change your background color:
- Click the relevant element in the Editor.
- Click Change Background.
- Click Color.
- Click the Color icon at the top of the color picker and select one of the following:
- Theme color: These are colors used in your site's theme that can be automatically applied to elements across your site. Select a color under Theme Colors to apply it to the background. You can also edit your theme colors by clicking Edit on the top right of the panel. Learn more
- My Colors: These are colors that you have previously added and saved on your site. Click a color under My Colors to apply it to the background.
- Choose a new color: Click +Add to select a new color. The new color is then available under My Colors to apply to elements across your site.
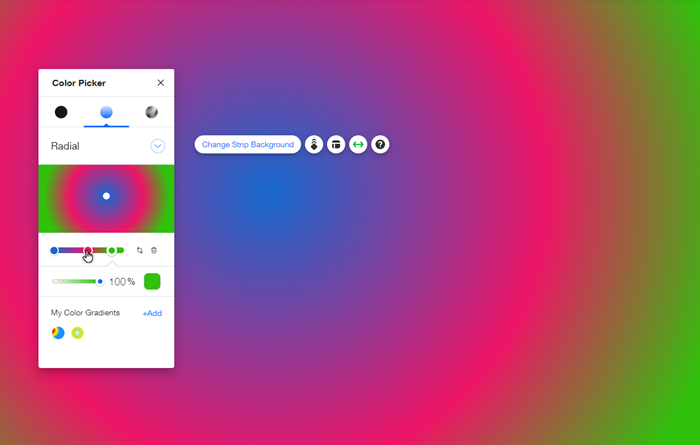
Adding a gradient to your background
Gradients are a fun, exciting way to customize your elements and site. Choose an effect and adjust the colors and opacity to create something eye-catching for your visitors. There are 3 types of background gradients:
- Linear: Colors in the gradient are at opposite ends, and merge along an invisible line.
- Radial: Colors surround each other and merge along a radius.
- Conic: Colors in the gradient have a rotated transition around the center point.
To add and customize a gradient:
- Click the relevant element in the Editor.
- Click Change Background.
- Click Color.
- Click the Gradient icon at the top of the color picker.
- Click the dropdown menu and select the type of gradient you would like to apply.
- Customize your gradient using the options:
- Linear:
- Angle: Choose the gradient's angle.
- Color positions & distance: Change the order of the colors, or bring them closer or further apart.
- Adjust colors & opacity: Change the color, and increase or decrease the opacity.
- Add a new color: Click anywhere on the bar that doesn't already contain a color dot to add and adjust a new color.
- Radial:
- Center dot: Set the center point of the gradient.
- Color positions & distance: Change the order of the colors, or bring them closer or further apart.
- Adjust colors & opacity: Change the color, and increase or decrease the opacity.
- Add a new color: Click anywhere on the bar that doesn't already contain a color dot to add and adjust a new color.
- Conic:
- Position and rotation: Click and drag the inner circle of center point to change its position on your background, and click and drag the outer circle to change the rotation of the color transition.
- Color positions & distance: Change the order of the colors, or bring them closer or further apart.
- Adjust colors & opacity: Change the color, and increase or decrease the opacity.
- Add a new color: Click anywhere on the bar that doesn't already contain a color dot to add and adjust a new color.
- Linear:
Want to save your gradient?
Simply click +Add at the bottom of the panel to save the gradient to use across your site.
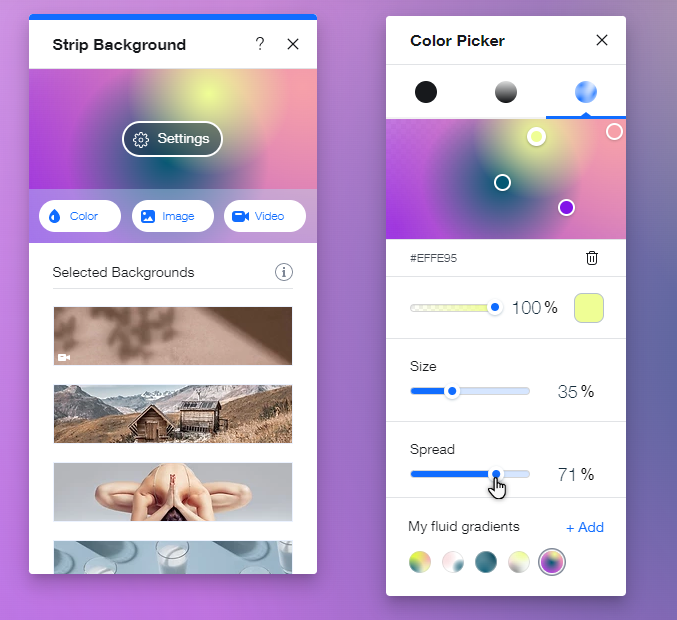
Adding a Fluid gradient to your background
Create a unique background for your elements using Fluid gradients. In these gradients, there are points along the gradient with different colors, which you can merge exactly how you'd like.
There are presets available for each gradient type at the bottom of the panel. These gradients are made using your site colors, and can be customized to suit you and your needs.
To add and edit a fluid gradient:
- Click the relevant element in the Editor.
- Click Change Background.
- Click Color.
- Click the Fluid Gradient icon at the top of the color picker.
- Customize your gradient using the options:
- Position: Change the position of each color in the gradient.
- Adjust colors & opacity: Change the color, and use the slider to increase or decrease the opacity.
- Size: Set the size of the colors in the gradient.
- Spread: Set how much each color spreads across the gradient.
- Color behind gradient: Select a color to display behind the gradient.
- Add a new color: Click anywhere on the preview that doesn't already contain a color dot to add and adjust a new color. Tip: You can add as many colors as you want, so there's no limit to how much you can customize the gradient.
Want to save your Fluid gradient?
Simply click +Add at the bottom of the panel to save the gradient for use across your site. You can apply and add new gradients under My Fluid Gradients on the panel.
Applying gradients to video or image backgrounds
If you have an image or video background on your element, you can also add a gradient effect behind it.
Simply select a video or image as your background, then adjust the gradient's opacity.
To apply gradients to a media background:
- Click the relevant element in the Editor.
- Click Change Background.
- Click Settings.
- Click the color box next to Color behind video / image.
- Create and add a gradient.
- Click X on the top of the color / gradient picker to close it.
- Drag the slider under Image opacity / Video opacity to make the background gradient as visible as you want.

Did this help?
|