Velo Tutorial: Adding a Product Configurator to a Wix Stores Site
Note: This tutorial and its steps are based on a Wix Editor site. You can adapt the steps for a Wix Studio site by using the equivalent Wix Studio features.
This article describes how you can use Velo to add a product configurator to a Wix Stores site. The product configurator allows site visitors to choose different patterns and colors to design a custom sweater. Throughout this article we're going to use the same site to illustrate the process. You can open the site in the Editor to work with the template. We're going to explain how we set up the sample site and the code we added to make it work.
Overview
In our site we added the following:
- A Sweater page including:
- A default sweater image and overlaid images for the body, sleeves, pocket, and neckline.
- Elements to display the name, price, and description.
- Sections for selecting the pattern or color for each sweater part. Each section has a collapsible container with a repeater containing buttons for selecting a pattern or color, plus a header button for expanding and collapsing each container.
- A combinedMaterialsImages collection. The collection has an item (row) for each pattern or color option available for each sweater part. The items includes images for displaying the pattern or color.
Then we added code to do the following:
- When the Sweater page loads, clear sweater customization settings.
- When a visitor clicks a header button, expand the container holding the repeater, displaying buttons with patterns or colors for the selection. Collapse containers in other sections.
- When a visitor clicks a button, store the visitor's choice in an object.
- When all selections are made, enable the Add to Cart button. When the visitor clicks the button, add the customized product to the shopping cart.
Step 1: Set Up the Site
To recreate this functionality, you'll need to have Wix Stores added to your site with at least one product. Once you add Stores to your site, you'll see pages and collections automatically added to your site.

The Products and Collections collections are created automatically when you have a site with Wix Stores. Because these collections are read-only, you must use the Store Manager to create your product list. In this example we don't work with the Collections collection, although it is in our sample site's store.
Note You may need to save or publish the site and refresh your browser to view the Stores collections in the Database.
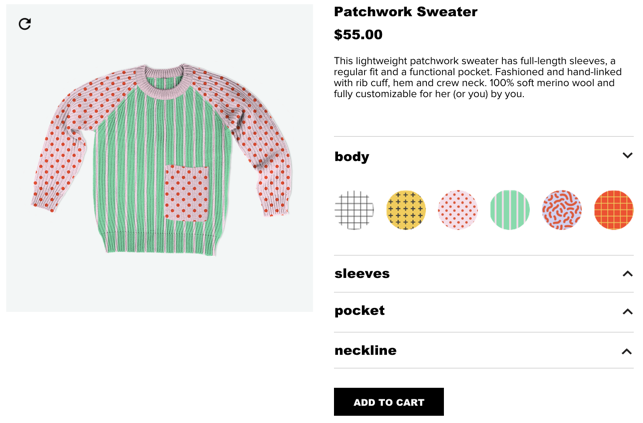
This example is based on the Patchwork Sweater product, one of the products in the Products collection.

We also added a Sweater page and a combinedMaterialsImages collection to our database. We'll describe the Sweater page's setup later in this article.

The combinedMaterialsImages collection has four fields:
- Title: The name of the pattern or color for the sweater part
- option: The part of the sweater that the pattern or color modifies
- choiceImage: A sample image of the pattern or color
- displayImage: An image of the sweater part with the specific pattern or color

The choiceImage images are used to display a sample of the pattern or color for each sweater part and the displayImage images display the selected pattern/color in the sweater picture.
Step 2: Set Up the Sweater Page
On the Sweater page we added:
- A strip to keep page elements neat and organized.
- A default image of the sweater, overlaid by images of each sweater part.
The default sweater image looks like this:

The individual parts of the sweater look like this:

-
We also added a refresh button to reset to the default sweater image and restart the sweater customization process.
Note that when the page is loaded or the refresh button is clicked, the individual sweater part images are hidden and the default sweater image is displayed.
-
The sweater's title, price, and description from the Products collection.

-
A container for customizing each sweater part, which collapses and expands.
-
A repeater inside each container with buttons for selecting the sweater part color or pattern. When the visitor hovers over a button, a black border appears (the hover effect is added using Button Design without code). Clicking a button selects a pattern or color for the sweater part.
-
A header button above each repeater with the name of the sweater part, and up and down arrows. Clicking the button expands the container holding the repeater for that sweater part, and collapses the containers for other sweater parts.
Note: In the image below, the two arrows are displayed separately. On the actual site, they're overlapping and the code controls which one is displayed.
-
Five datasets:
- A Products collection dataset for displaying the title, price, and description of the product.
- Four filtered datasets connected to the combinedMaterialsImages collection, one for each sweater part. The datasets are filtered by option (body, sleeves, pocket, neckline). Each filtered dataset is connected to the buttons in the corresponding repeater.

-
An Add to Cart button for adding the customized sweater to the visitor's cart. The Add to Cart button is disabled and appears gray by default. After selecting patterns or colors for all sweater parts, the button is enabled and appears black.

-
A shopping cart icon that displays the number of products added to the cart. Clicking the cart brings the visitor to the Cart page, where they can check out.
Step 3: Prepare the Sweater Page
On the Sweater page we start by importing the module we need to work with the Wix Window Frontend. We use this module to check whether the visitor is on a desktop or mobile device. This code needs to be added at the top of the code editor.
Then we declare global variables to be used throughout the code. Finally, we call the clearSelection function to clear customization settings and return the sweater to its default state.
Note All code for this example is located on the Sweater page.
Understanding the Code
Line 1: Import the module we need to work with the Wix Window Frontend library.
Line 2: Import the module we need to work with the Wix Stores Cart API in Step 11.
Lines 3-5: Define the following variables:
NUMBER_OF_CHOICES: Number of sweater parts that can be customizedproductId: Hard-coded product ID of the sweater from the Products collectionselectedOptions: An object that stores the selected pattern or color for each sweater part
Lines 7-8: When the page loads, call the clearSelection function to clear customization settings.
There are no identifiers you would need to change here to make this code work on your site.
Step 4: Create the refreshButton_click Function
When the refresh button on the sweater image is clicked, the refreshButton_click event handler clears sweater customization settings by calling the clearSelection function.
Understanding the Code
Lines 1-2: When the refresh button is clicked, run the clearSelection function to clear sweater customization settings.
There are no identifiers you would need to change here to make this code work on your site.
Step 5: Create the clearSelection Function
The clearSelection function clears all the customized selections so the sweater reverts back to the default setting. clearSelection runs when the Sweater page loads and when a visitor clicks the refresh button on the sweater image.
Understanding the Code
Line 2: Clear the selectedOptions object, which contains the visitor's pattern or color selections for each sweater part.
Lines 3-6: Hide the overlaid sweater part images so that only the default sweater is displayed.
Lines 7-10: Clear the sweater part images.
Line 11: Disable the Add to Cart button.
Identifiers you may need to change based on your site's collections
If you want to use this exact scenario and code in your site, you may need to modify these items to match the ones on your site:
#bodyImg#sleevesImg#necklineImg#pocketImg#addToCartButton
Step 6: Create the bodySelectionRepeater_itemReady Function
Note In this section, we use the "body" part of the sweater as an example. The code is the same for the other sweater parts, except for the following:
- The word "body" is replaced with "sleeves", "pocket", or "neckline".
- The toggleFold parameter (1) is replaced by the corresponding index number (2, 3, and 4) for each sweater part.
We selected the repeater element and, in the Properties & Events panel, added an onItemReady event handler.
The bodyDataset filters the combinedMaterialsImages collection to include only items in the collection whose option field is body. Each filtered item (row) in the collection is passed to the bodySelectionRepeater_itemReady event handler as the itemData parameter.
After the page loads and the filtered dataset connects to the repeater, bodySelectionRepeater_itemReady loads each pattern/color image associated with "body" items into a button in the repeater.
When the visitor clicks a button in the repeater, an onClick event handler runs the selectChoiceForOption function.
If the visitor is using a mobile device, when they click a button, the toggleFold function runs, collapsing the container holding the repeater.
Understanding the Code
Line 1: Set up each item in the bodySelectionRepeater as it's loaded.
Line 2: Set the action that occurs when a visitor clicks a choice for the body option.
Line 3: When a button is clicked, run the selectChoiceForOption function for the body sweater part with the selected itemData from the collection.
Lines 4-5: Check whether the site is being viewed on a mobile device. If it is, run toggleFold with the index number associated with the body sweater part to collapse the container holding the repeater.
Identifiers you may need to change based on your site's collections
If you want to use this exact scenario and code in your site, you may need to modify these items to match the ones on your site:
#selectBodyButtonbody
Step 7: Create the selectChoiceForOption Function
The selectChoiceForOption function runs when a visitor selects a particular pattern or color for a sweater part. It adds the selection to the selectedOptions object, displays the selected pattern or color on the sweater part, and when all sweater part selections are finished, enables the Add to Cart button.
Understanding the Code
Line 1: Run the function with the following parameters:
$w: Global selectoroption: The current sweater part (e.g., body)choiceData: The item from the combinedMaterialsImages collection that was selected.
Line 2: Add the name of the pattern/color for the selected choice to the selectedOptions object (e.g., Body: Stripe Pattern). Since the sweater part options are capitalized in the Product collection, we first capitalize the option key.
Line 3: Use ${expression} inside a template literal (string indicated by backticks) to extract the name of the sweater part image from the option parameter. Change the image to the selected choice's displayImage from the combinedMaterialsImages collection.
Line 4: Show the selected image in the sweater.
Line 5: Check if the selectedOptions object contains selections for all sweater parts. This is done by comparing the length of the object (using the Object.keys function) to the number of choices.
Line 6: If all sweater part selections were made, enable the addToCartButton button.
Identifiers you may need to change based on your site's elements
If you want to use this exact scenario and code in your site, you may need to modify these items to match the ones on your site:
#${option}Img#addToCartButton
Step 8: Create the capitalizeFirstLetter Function
The capitalizeFirstLetter function capitalizes the first letter of the string passed to the function.
Understanding the Code
Line 2: Capitalize the first letter of the input string. This is done by using the chartAt function to return the first letter of the string, using toUpperCase to capitalize the letter, and using slice to remove the second (lowercase) letter.
There are no identifiers you would need to change here to make this code work on your site.
Step 9: Create the option1Button_click Function
Note In this section, we use the "body" part of the sweater as an example. The code is the same for the other sweater parts, except for the following:
- Replace the number "1" in option1button_click by the corresponding option number (2, 3, and 4).
- Replace the number "1" by the corresponding option number (2, 3, and 4) for the parameter passed to the toggleFold function.
option1Button_click is an onClick event handler that calls the toggleFold function when the button above the repeater is clicked. We explain toggleFold in Step 10.
Understanding the Code
Line 2: Call the toggleFold function with an index of "1".
There are no identifiers you would need to change here to make this code work on your site.
Step 10: Create the toggleFold Function
toggleFold expands or collapses the container under the button clicked by the visitor. If the container is currently collapsed, the function expands the container. If the container is currently expanded, the function collapses the container. toggleFold also collapses all other sweater part containers.
Understanding the Code
Lines 2-4: Define identifiers for the current sweater part's container, up arrow, and down arrow.
Lines 5-8: If the current container is collapsed, expand it, hide the up arrow, and show the down arrow.
Lines 9-13: If the current container is expanded, collapse it, hide the down arrow, and show the up arrow.
Line 14: Collapse all other containers. For each sweater part index:
Line 15-18: If the index is not associated with the current sweater part, collapse the container, hide the down arrow, and show the up arrow.
Identifiers you may need to change based on your site's elements
If you want to use this exact scenario and code in your site, you may need to modify these items to match the ones on your site:
#option1Box#arrowUp#arrowDown
Step 11: Create the addToCartButton_click Function
addToCartButton is an event handler that runs when the Add to Cart button is clicked. It runs the Wix Stores Frontend API cart.addProducts function, adding the customized product to the cart.
Understanding the Code
Line 2: Run the addToCart function on the shopping cart with the following inputs:
- The sweater's product ID
- Quantity of customized sweaters to add to cart
- Sweater options selected by the visitor contained in the
selectedOptionsobject
Identifiers you may need to change based on your site's elements
If you want to use this exact scenario and code in your site, you may need to modify these items to match the ones on your site:
shoppingCartIcon1
Next Steps
- Open this example in the Editor to work with the template.
- Publish the site and refresh your browser so the Stores collections appear in the Database.
- Try other Velo Store examples: