Velo: Integrate your Microsoft Azure Database with your Wix Site
Note: This feature is only available for sites with certain premium plans. If you need to use this feature, you can upgrade your site. Learn more about premium plans.
Wix data gives you powerful data storage and retrieval capabilities and the ability to create and maintain your own data collections. But what if you have your own database already, or want to host your data on a relational database?
With the external database connections adaptor, you can use your MySQL database hosted on Azure and fully integrate it into your Wix site. You can use any of the wix-data and wix-dataset APIs with external database connections, as well as connect repeaters, tables, and other page elements to your MySQL data.
If you want to do this with AWS, see Integrate your AWS Databases with your Wix Site. For Google Cloud Platform, see Integrate your Google Cloud Platform Databases with your Wix Site.
Overview
This tutorial walks you through setting up a MySQL instance and database on Azure, setting up the Wix adaptor, and connecting it to your Wix site.
Here's what's involved:
- Create a resource group.
- Create a virtual network.
- Create an Azure database server for MySQL.
- Create a new database and table.
- Create a web app.
- Set up a key vault and secrets.
- Test your adaptor.
- Connect your Wix site.
Create a Resource Group
A resource group is a container that holds related resources for an Azure solution. The resource group contains the database, web app, and key vault which are created in the tutorial.
To create a resource group:
-
From the Azure portal, search for and select Resource groups.

-
Click Create, then select your Subscription, enter a name for your Resource group, and select a region.
-
Click Review and create.
-
On the following page, click Create.

Create a Virtual Network
Create a virtual network so that your database and web app can talk to each other.
-
From the Azure portal, search for and select Virtual networks, then click Create.

-
Select your Subscription and the Resource group that you created in the previous step.
-
Enter a Name for your virtual network, select a Region, and click Next : IP Addresses.

-
Click Add subnet.
-
Enter a Subnet name.
-
Enter a Subnet address range of 10.1.1.0/24.
-
Select Microsoft Sql in the Services dropdown and click Add.
-
Click Review + create, then click Create on the following page.

-
When the virtual network creation completes, click Go to resource.
-
Click Subnets, then click the subnet that you created.

-
In the SUBNET DELEGATION section, select Microsoft.Web/serverFarms from the Delegate subnet to a service dropdown, then click Save.

You now have the following:
- A resource group called myResourceGroup
- A virtual network called myVirtualNetworks
- A subnet called mySubnet
Create an Azure Database Server for MySQL
-
From the Azure portal, search for and select Azure Database for MySQL servers, then click Create Azure Database for MySQL Server.

-
Under Flexible server, click Create.

-
Select your Subscription and the Resource group that you created earlier.
-
Enter a Server name.
-
Select the same Region as you chose for your resource group.
-
Enter an Admin username, and Password.
-
Click Review + create and on the next page click Create.
-
When the deployment completes, click Go to resource to go to the server's overview page.

-
Click Connection security.
-
Set Allow access to Azure services to Yes.
-
Set Enforce SSL connection to DISABLED.
-
Under Firewall rules, click Add existing virtual network.

-
Enter a vnet rule Name.
-
Select your Subscription and the Virtual network and Subnet name that you created earlier.
-
Click OK.
-
After the changes have been processed, click Save.

Create a New Database and Table
You created a database server in the previous step. This section walks you through creating a new MySQL database and table.
Prerequisites for Read-Write Access to Your Database Table: If you want your table to be read-write on your Wix site, it must contain the following columns:
_id_createdDate_updatedDate_owner
Tables without these columns are read-only in your Wix site.
To create a new database and table:
-
From the database server's Overview page, open the Azure Cloud Shell by clicking the
 button on the toolbar, next to the search bar.
 -
If this is the first time you have opened the cloud shell, at the welcome prompt select Bash.
-
Select your Subscription and click Create storage.

-
Login to the database server using the following command, then enter your password.
Copy1mysql --host=velo-mysql-server.mysql.database.azure.com --user=veloAdmin@velo-mysql-server -pUse your Server name for the --host parameter and your Server admin login name for the --user parameter.

-
After logging in, create a new database called mysqlTutorial using the following command:
Copy1CREATE DATABASE mysqlTutorial; -
Create a new table called contacts as follows:
Copy1CREATE TABLE mysqlTutorial.contacts(2_id varchar(50) NOT NULL,3_createdDate timestamp NULL DEFAULT CURRENT_TIMESTAMP,4_updatedDate timestamp NULL DEFAULT CURRENT_TIMESTAMP,5_owner varchar(50) DEFAULT NULL,6name varchar(30),7email varchar(30),8phone varchar(15),9PRIMARY KEY (_id)10); -
Insert a row of data into your new table:
Copy1INSERT INTO mysqlTutorial.contacts (`_id`,name,email,phone) VALUES2('000001','Wix','wix@wix.com','555 1234');
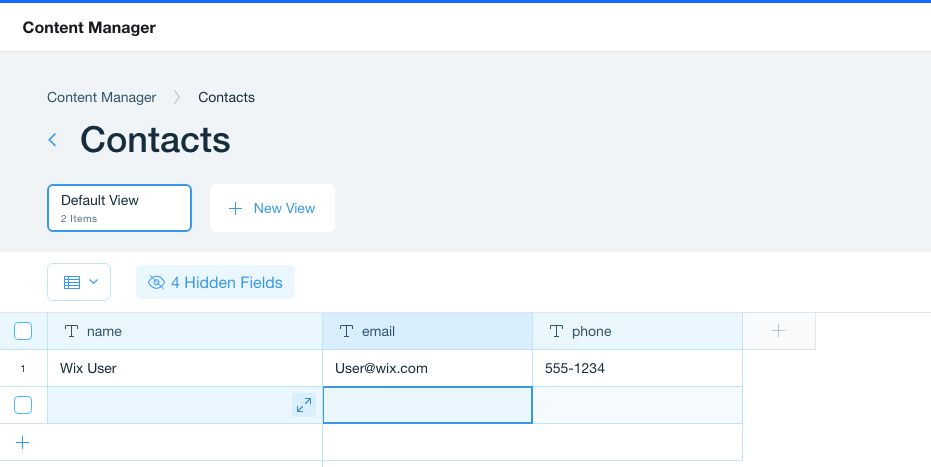
You now have a new database called mysqlTutorial with a table called contacts containing a single row of data.
Create a Web App
A web app service is needed to run the adaptor and make it accessible to your Wix site.
To deploy the adaptor as a web app:
-
Create a web app service to run the container.
-
Add the virtual network to the web app.
-
Create a key vault and secrets to securely store your database credentials.
-
Search for App Services and select it from the Services list.

-
Click Create.
-
Select your Subscription and the Resource group that you created earlier.
-
Enter an instance Name.
-
Select Docker Container and Linux.
-
Select the same Region as your database.
-
Click Next: Docker.
-
Select Single Container, Docker Hub, and Public.
-
Enter veloex/velo-external-db:latest in the Image Name and Tag field.
-
Click Review + create then click Create.
-
When the create completes, click Go to resource.

Now configure your web app to use the virtual network that you configured earlier, so that the database and the adaptor are on the same network.
-
Click on Networking then VNet integration

-
Click Add VNet.
-
Select the Virtual Network that you created earlier.
-
Click Select Existing and select the Subnet that you created earlier.
-
Click OK.

Set up a Key Vault and Secrets
The external database adaptor uses environment variables to configure database credentials and connection details. Some of these variables are sensitive and should not be visible. Use the Key Vault to store and access these variables securely.
-
Search for Key vaults and select it from the Services list.
-
Click Create.

-
Select your Subscription and the Resource group that you created earlier.
-
Enter a Key vault name. For the tutorial call it my-velo-DB-key-vault.
-
Click Review + create and then Create on the following page.
-
When the key vault creation completes, click Go to resource.

-
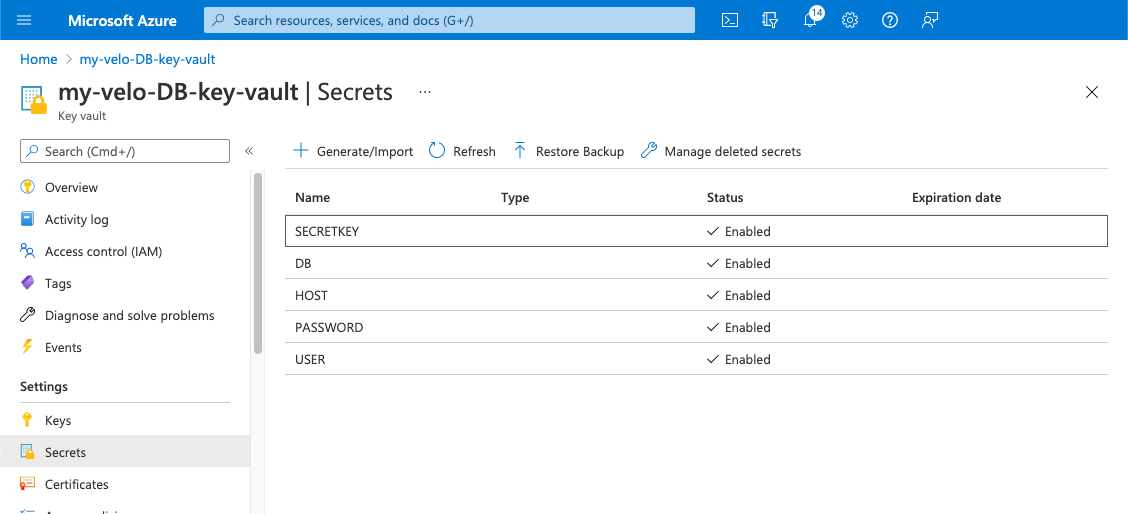
From the key vault Overview page, click Secrets.

Define 5 secrets:
-
HOST: The host name of your database instance. It can be found on your instance's overview page as the Server name.
-
USER: The username used to connect to your database instance. It can be found on your instance's overview page as the Server admin login name as shown below.
-
PASSWORD: The server admin login password used to connect to your SQL instance.
-
DB: The database name. When you created your database in the previous steps, you called the database mysqlTutorial. You can find this in the MySQL database server overview - under Available Resources at the bottom of the page.
-
SECRETKEY: A secret key that's used when connecting your Wix site to the adaptor. To create a level of authentication between your site and the adaptor, each request your site sends to the adaptor contains this value in the payload. For the tutorial, use myBigSecret as the SECRETKEY value.
-
PERMISSIONS (optional) A stringified JSON object that defines the read and write permissions for the tables in your database.
Note: Customizing permissions for external databases is currently a developer preview feature, and may change. Changes to permission settings are not reflected in the editor.
Learn more about configuring database permissions
By default, only site Admins can read and write to external databases on Wix sites. You can use the PERMISSIONS secret to customize the permission settings for each table in a database. The JSON object contains one key, collectionPermissions, whose value is an array of objects. Each object in this array contains the permissions settings for one of the collections in the database, using the following parameters:
- id: The collection ID.
- read: An array of strings representing which roles can read from the collection.
Options: 'Admin', 'Member', 'Visitor' - write: An array of strings representing which roles can write to the collection.
Options: 'Admin', 'Member', 'Visitor'
Example PERMISSIONS value:
Copy1{2"collectionPermissions": [3{4"id": "Contacts",5"read": ["Admin", "Member"],6"write": ["Admin"]7}8]9}Note that you need to store the PERMISSIONS JSON object as a string. To do this, first write the object as usual and use a tool such as your browser’s developer tools console to stringify it.
-
-
For each of the 5 secrets, do the following:
-
Click Generate/Import.
-
Select Manual from the Upload options dropdown.
-
Enter the secret Name and Value.
-
Click Create.

-
When finished, your key vault looks as follows:
Create an Identity for the Web App
To give the web app access to the secrets, create an identity, then add that identity to the key vault's access policies.
-
From the web app overview page, click Identity.
-
Set the status to On and click Save.

-
An Object (principal) ID is created. Save the object ID value to use when creating an Access Policy for your key vault.

Add the Web App's Identity to the Key Vault's Access Policies
Now you need to give your web app access to your secrets. Do this by adding the web app's identity object Id to the access policies of the key vault.
1 From the key vault Overview page, click Access policies.
-
Click Add Access Policy.

-
Select Secret Management from the Configure from template dropdown.
-
Click None Selected.
-
Paste the Object ID from the Create an Identity for the Web App step, into the Principal search field.
-
Select the item that appears below the search field and click Select.
-
Click Add.

-
Click Save.

Configure Web App Environment Variables
Now we'll configure the environment variables for the adaptor. The variables are configured in the web app. The values for these variables are retrieved form the key vaults's secrets.
-
From the web app Overview page, click Configuration.
-
Click New application setting.

-
For each of the secrets you created in the previous section, add an application setting as per the table below:
Substitute the value for "VaultName" with your own key vault name. The vault name we used for the tutorial is my-velo-DB-key-vault.
Name Value USER @Microsoft.KeyVault(VaultName=my-velo-DB-key-vault;SecretName=USER) HOST @Microsoft.KeyVault(VaultName=my-velo-DB-key-vault;SecretName=HOST) DB @Microsoft.KeyVault(VaultName=my-velo-DB-key-vault;SecretName=DB) PASSWORD @Microsoft.KeyVault(VaultName=my-velo-DB-key-vault;SecretName=PASSWORD) SECRET_KEY @Microsoft.KeyVault(VaultName=my-velo-DB-key-vault;SecretName=SECRETKEY) PERMISSIONS @Microsoft.KeyVault(VaultName=my-velo-DB-key-vault;SecretName=PERMISSIONS) Note: When configuring the SECRETKEY, the application setting is SECRET_KEY but the secret name is SECRETKEY. This is because you cant use an "_" in a secret name in Azure.

Now set up 2 non-secret environment variables.
-
Click New application settings to add 2 more application settings as per the table below:
Name Value TYPE mysql CLOUD_VENDOR azure -
Click Save and then Continue after entering the new application settings.

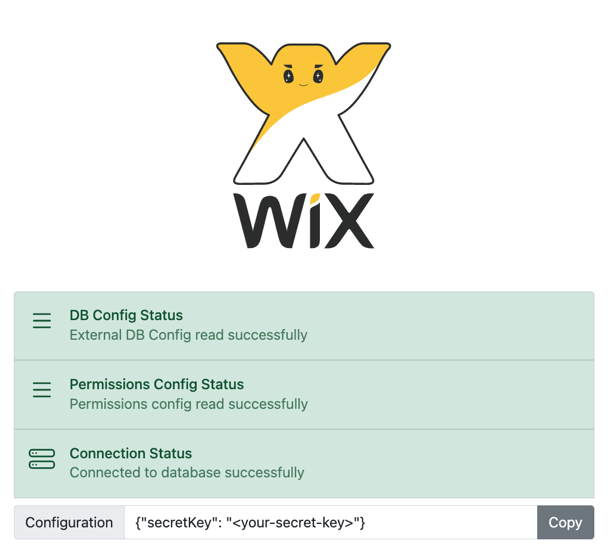
To test your web app configuration, click the URL from the overview page.
1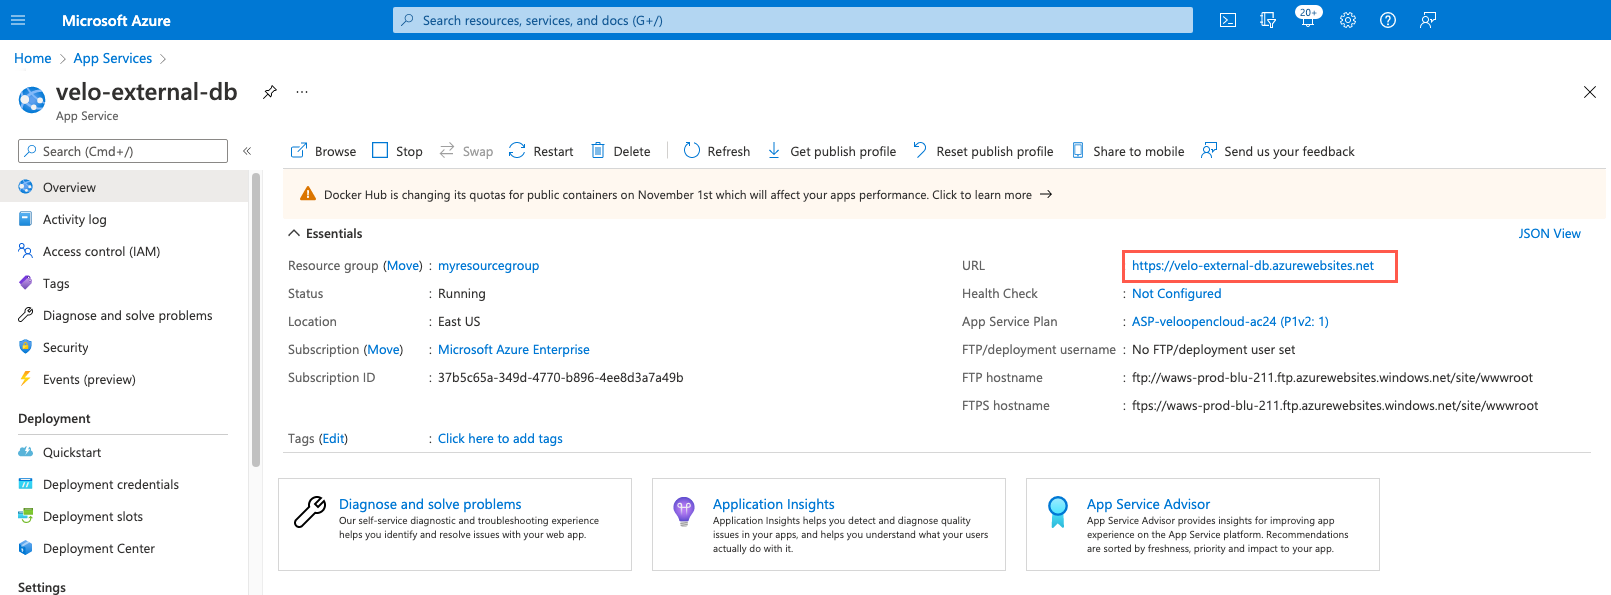
The following page displays DB Config Status and Connection Status in green. If you added a PERMISSIONS secret, the Permissions Config Status is also green. If you didn't, it's yellow.
If one of the statuses is red, check the configuration, secret values, and environment variables. Make any necessary changes and redeploy the service.
Test Your adaptor
You can test that your service is working by making a quick request using Curl.
Use the curl command below, replacing the URL with your URL from the web app overview page, and replacing the secretKey value with your secret key.
1curl -L -X POST 'https://velo-external-db.azurewebsites.net/schemas/list' \2-H 'Content-Type: application/json' \3--data-raw '{4 "requestContext": {5 "settings": {6 "secretKey": "myBigSecret"7 },8 "role": "OWNER"9 }10}'
The output provides a list of tables and their columns from your database. If you have python installed, you can pipe the output to python -m json.tool and it will give you nicely formatted JSON.
The formatted output containing a list of tables and their columns:
1{2 "schemas": [3 {4 "id": "contacts",5 "displayName": "contacts",6 "allowedOperations": [7 "get",8 "find",9 "count",10 "update",11 "insert",12 "remove"13 ],14 "maxPageSize": 50,15 "ttl": 3600,16 "fields": {17 "name": {18 "displayName": "name",19 "type": "text",20 "queryOperators": [21 "eq",22 "lt",23 "gt",24 "hasSome",25 "and",26 "lte",27 "gte",28 "or",29 "not",30 "ne",31 "startsWith",32 "endsWith"33 ]34 },35 "_createddate": {36 "displayName": "_createddate",37 "type": "datetime",38 "queryOperators": [39 "eq",40 "lt",41 "gt",42 "hasSome",43 "and",44 "lte",45 "gte",46 "or",47 "not",48 "ne",49 "startsWith",50 "endsWith"51 ]52 },53 "email": {54 "displayName": "email",55 "type": "text",56 "queryOperators": [57 "eq",58 "lt",59 "gt",60 "hasSome",61 "and",62 "lte",63 "gte",64 "or",65 "not",66 "ne",67 "startsWith",68 "endsWith"69 ]70 },71 ...
Connect to Your Wix Site
Now that we have a database and an adaptor service, we're ready to add the database as an external collection on our Wix site.
Note: You can only add external collections to your site if you have a premium plan.
-
In the editor, select Databases from the Velo sidebar (Wix Editor) or Code sidebar (Wix Studio).
-
Click the
 icon next to External Databases and select Add external database.
-
Choose Azure as the provider of the external collection being added, then click Next.

-
Enter a name for your external collection's namespace.
-
Copy and paste your adaptor service's URL into the endpoint URL field.
-
Enter your database adaptor's secret key.
-
Click Connect.

The Content Management System (CMS) displays the tables. If your table contains _id, _createdDate, _updatedDate, and _owner fields, you can add data to the table directly from the CMS.