CMS (Formerly Content Manager): Managing Collection Content from Your Live Site
9 min read
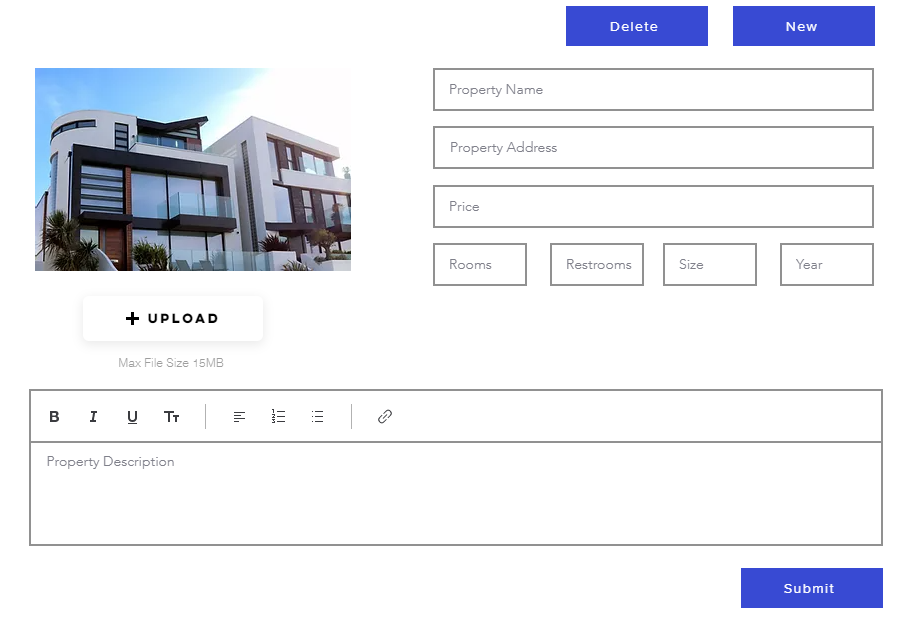
Create a page that allows people to add, edit or delete collection content from your live site. One useful scenario for this is for visitors submitting text and images to a Members Area. Another example, illustrated below, is a form on a property site. This one allows visitors to add, delete or update entries.
Before you begin:
- Add the CMS (Content Management System) to your site.
- Create a collection in which you will store the content.
New datasets experience:
In Wix Studio, we've moved datasets to the Inspector panel on the right to make them easier for you to use. Learn more about the new datasets experience in Wix Studio.
Step 1 | Create a form with input elements
Build custom forms for your site's specific needs by adding input elements to your site. The elements used to make up your form accept content such as text and file uploads from visitors. Your collection saves the content submitted through the form. Learn more about creating a form with user input elements.
Wix Editor
Editor X
- Go to your editor.
- Go to the page in which you want to add input elements.
- Click Add Elements
 on the left side of the editor.
 - Click Input.
- Click and drag the relevant input element onto your page.
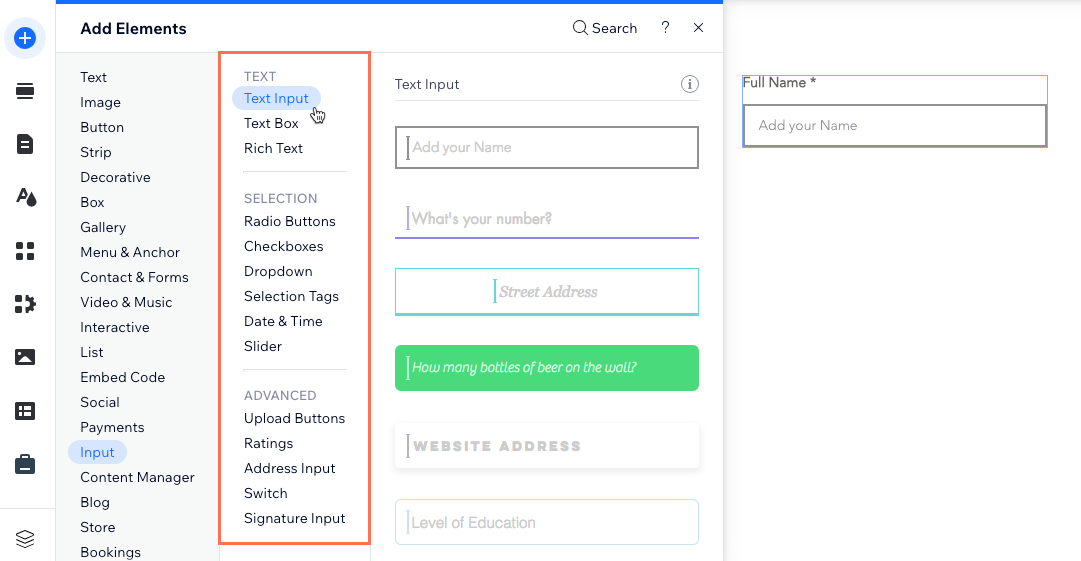
- Click the input element you added and select Settings.
- Fill out the settings. The options vary depending on which input element you selected.
- (If available) Click the element and select Manage Choices or Set Up Ratings to set the selection options.
- (Optional) Click the Layout
 and Design icons
  to change the layout or design.
Step 2 | Add a Read & Write dataset
There are two different settings that affect what users can do and who can do it. One is the dataset mode in the dataset, the other is Permissions & Privacy in the collection.
The dataset mode determines what actions can be done between the connected elements and your collection. The collection's Permissions & Privacy settings determine who can view or edit the collection content. Learn more about the dataset modes and collection permissions.
To add a Read & Write dataset:
- Click the first input element in the editor.
- Click the Connect to CMS icon
 .
. - (First time only) Create a dataset:
- Click Create Dataset.
- Click the Choose a collection drop-down and select the relevant collection.
- (Optional) Edit the name of the dataset.
- Click Create.
- Click the Value connects to drop-down, and select a field in your collection (or add a new one) to store the relevant data.
- Click the dataset in the Editor.
- Click Settings.
- Click the Mode drop-down and select Read & Write.
- Repeat these steps for each user input and connect them all to the same dataset.
Step 3 | Add and set up an interactive button
Add a button that visitors can click to interact with your collection data. Then customize the button and connect it to the same dataset as your input elements.
You can add a submit button to store the user input values in your collection. In the dataset, set the Click action connects to drop-down to "Submit" so the button sends the inputs to your collection. You can choose from several different click actions to create interactive buttons (e.g. apply filters, new, or delete).
To add and set up a submit button:
- Click Add Elements on the left side of the editor.
- Click Button.
- Select a button and drag it onto the page.
- Click Change Text & Icon and enter text that describes what the button does (e.g. Submit).
- Click the Connect to CMS icon
 .
. - Click the Connect a dataset drop-down and select the same dataset you connected to your input elements.
- Click the Click action connects to drop-down and select the relevant click action (e.g. Submit).
- (Optional) Add a success message that appears when the click action works as expected:
- Click + Add success message.
- Click and drag the success message to the location where you want it to appear.
- (Optional) Add a failure message that appears if the click action fails:
- Click + Add failure message.
- Click and drag the failure message to the location where you want it to appear.
- Click the When successful, navigate to drop-down, and select an option:
- Stay on this page: The visitor stays on this page after clicking the button.
- A link: The visitor is redirected to another page after clicking the button. Click Choose under Choose a link and set up the link.
- (Optional) To make your button label change dynamically, click the Label connects to drop-down. Select the text field in your collection that you want to use as your button's label.
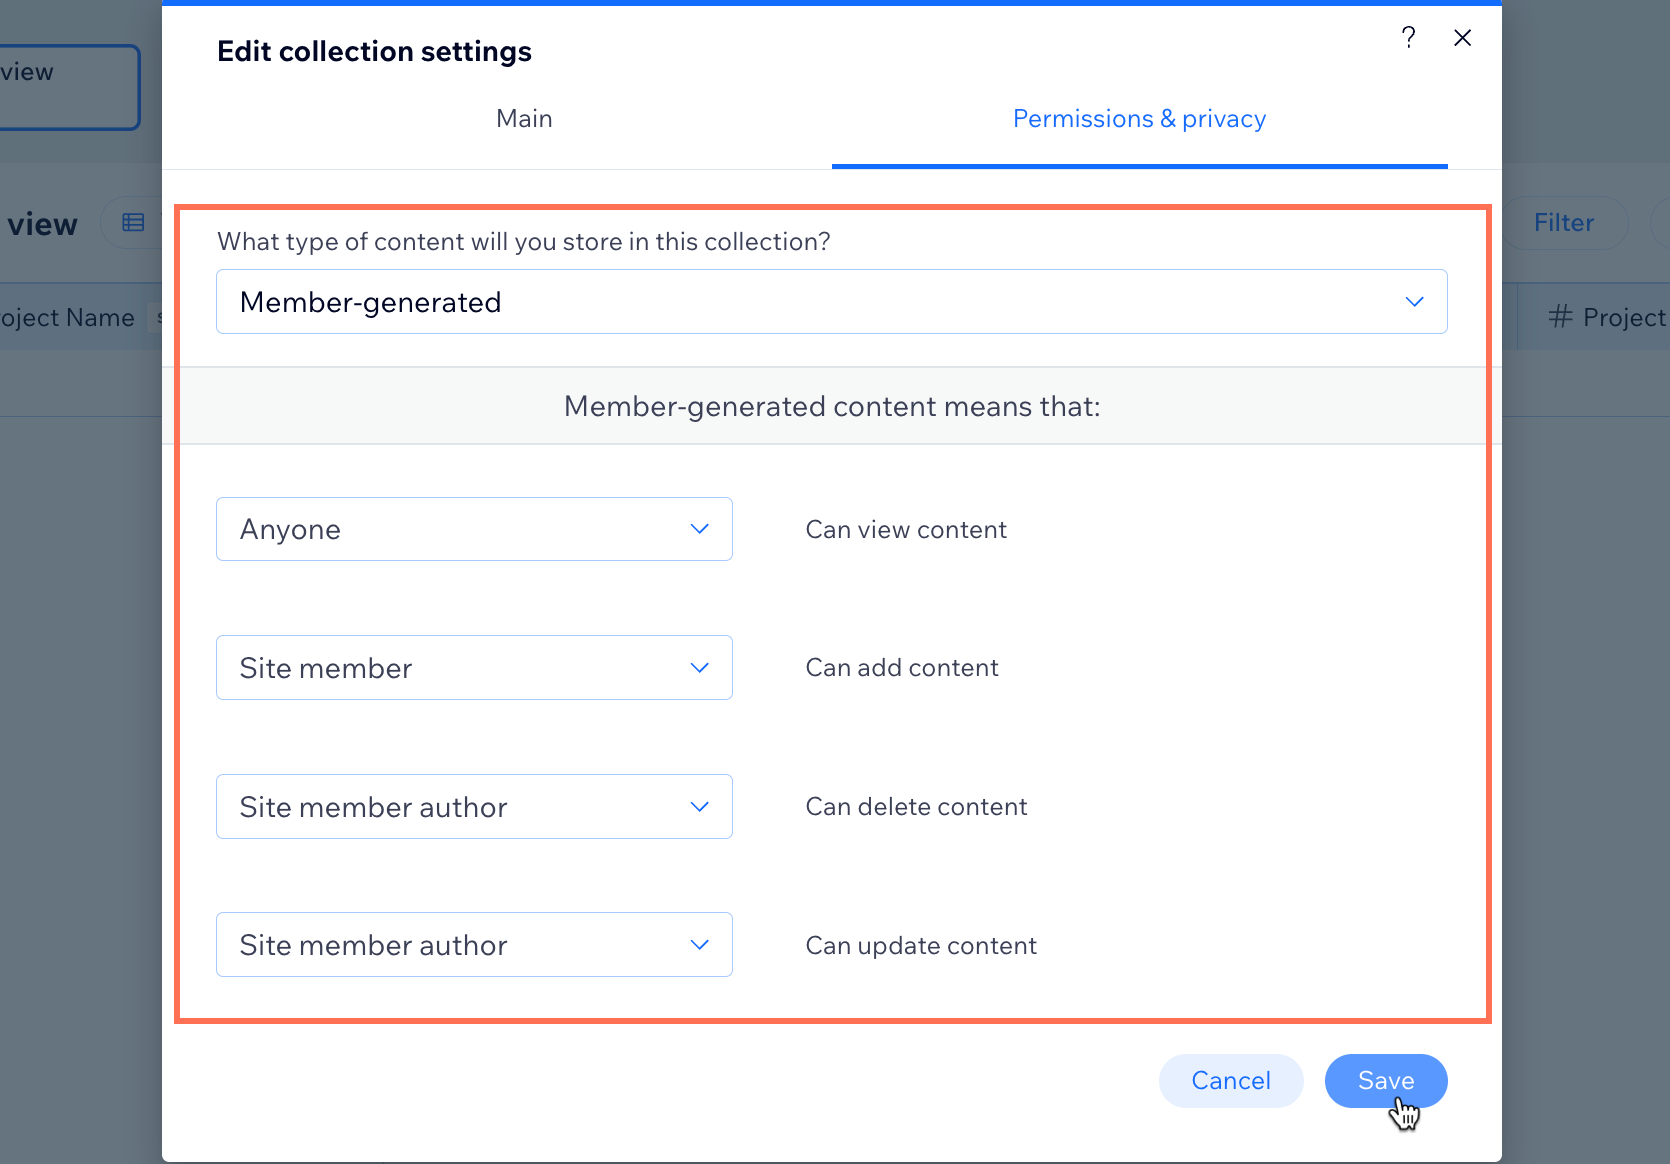
Step 4 | Set the collection permissions to allow content editing
Your collection's permissions & privacy settings determine who can view, add, delete, and update the items in the collection. Set custom permissions to choose who you want to have access to editing the collection. You can fine-tune these settings, for example, if you want to restrict edit access to site members.
Learn more about changing your collection permissions in the CMS.
To set collection permissions:
- Go to CMS in your site's dashboard. Alternatively, you can click CMS
 in your editor, then click Your Collections.
 - Click the relevant collection.
- Click More Actions at the top and select Permissions & privacy.
- Click the What type of content will you store in this collection? drop-down and choose an option:
- Custom: Define who can view, add, delete, and update content from the relevant drop-downs.
- Member-generated: Allow anyone to view content, site members to add content, and site member authors to delete or update content. Click the relevant drop-downs to adjust permissions.
- Click Save.
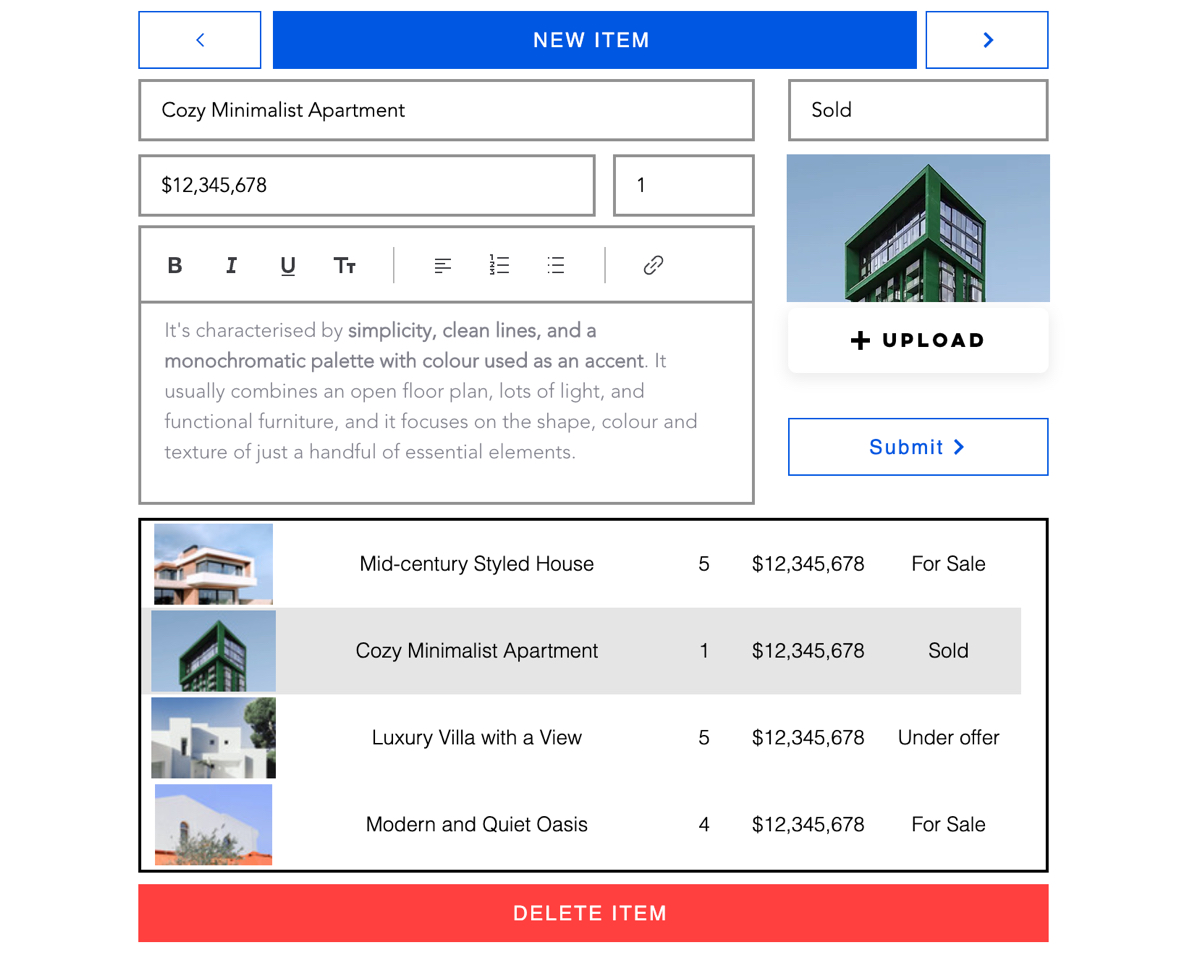
Step 5 | Add a table to select and edit specific items
With a custom form complete, you and your site visitors can add content to your collection. To select and edit specific items from your live website, you need to add a table.
Important:
Tables are not yet available in Editor X. As an alternative, set up buttons to navigate between items. To do this, use the 'Previous Item' and 'Next item' under the Click action connects to drop-down of your dataset. You can then edit the content that appears in your form and click Submit to update that item. You can also set up buttons to create a new entry or delete an existing one.
To add a table:
- Click Add Elements on the left side of the editor.
- Click List.
- Click Tables.
- Drag your table of choice onto your page.
- Click the Connect to CMS icon
 .
. - Click the Connect a dataset drop-down and select the appropriate dataset.
- Use the drop-down menus under Connection Options to connect the table columns to fields in your collection.
- Click Manage Table to arrange the columns as required.
- Click Publish.
On the live site, items will appear on your table as content is added. Edit the content for each item using the custom form.
You can connect buttons to dataset click actions for more functionality like adding and deleting items from your collection. You can also add buttons to navigate between items by setting them to show the 'next item' or 'previous item'.
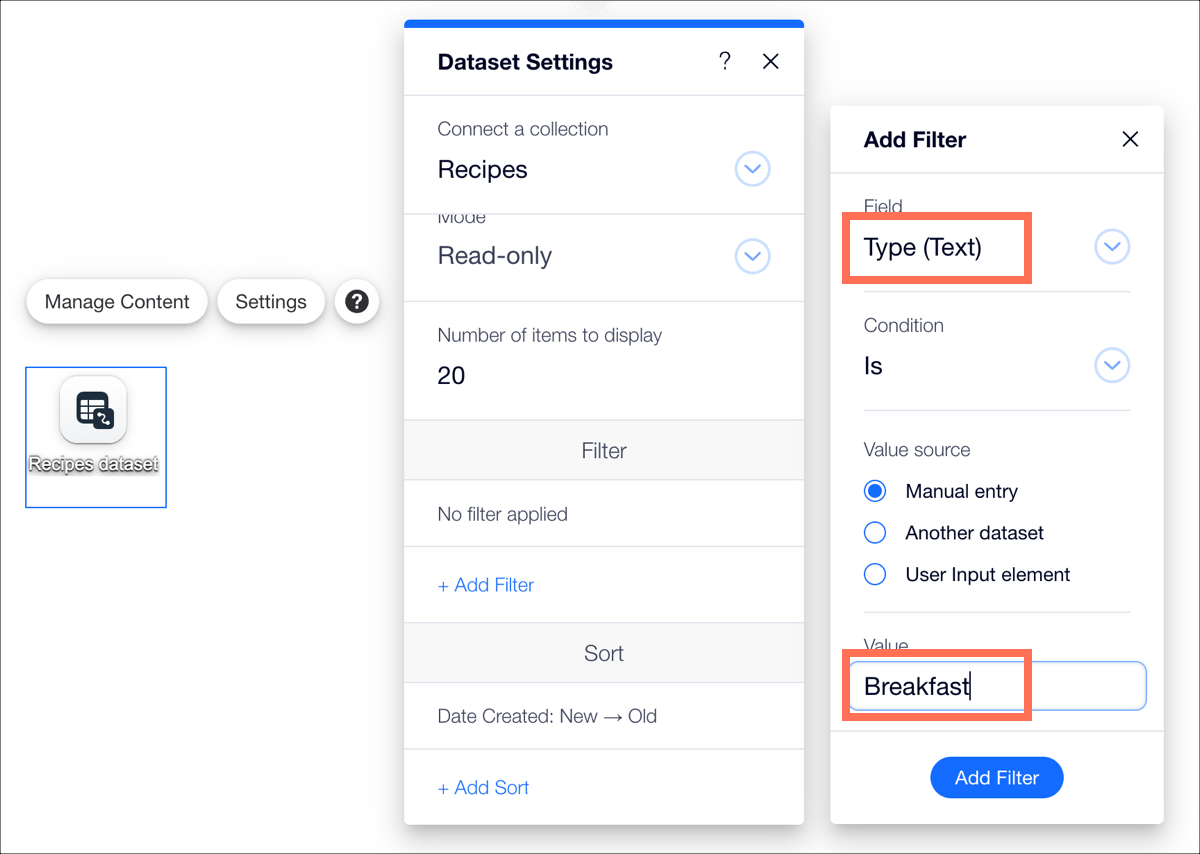
(Optional) Add a filter to display specific items
Set up filters in your dataset, so your site visitors view specific content. For example, if you have a recipe website, you can set a filter for recipes based on a preferred course, like breakfast, lunch, or dinner. Site visitors can then browse your filtered collection items by using a table.
To add a filter to browse items:
- Click the dataset element on your page.
- Click Settings.
- Click + Add Filter.
- Use the options to filter the content by a field in your collection. For example, you can display only breakfast items from a collection of recipes. Set the filter using the 'Type' field, where the type field contains breakfast, lunch, and dinner. Add the specific value to the 'Value' field. In this case, the value is 'Breakfast'.
- Click Add Filter.
Note:
You can automate the process of creating an entry on the collection using Velo by Wix. Learn more about building a members area where visitors can view and update their personal profiles at any time.
Did this help?
|