CMS: Allowing Visitors to Upload Multiple Media Files with the Upload Button
7 min read
Important:
Some functionality that allows you to test this feature in preview mode is not available to everyone. Use your live site to properly test uploading multiple media files with the Upload Button.
Let your site visitors upload multiple media files at once (video and image files only), by adding the Upload Button to your page.
For example, if your website is about art, you can accept multiple images from an artist. For a recipe-sharing website, visitors can upload entries that include multiple video clips of cooking.
Using the Media Gallery field type in your collection, you can set up your website to accept and upload multiple media files at once.
Note:
Currently, you can upload multiple video or image files only.
If you already have a page with an Upload Button in place, you can add a Media Gallery field to the collection and adjust the settings of your Upload Button:
Show me how to set up an existing Upload Button to accept multiple media files
 .
.Tip:
Uploaded media files can be displayed by connecting a Wix Pro Gallery to your collection.
Step 1 | Create a collection
This collection is where your visitors' media uploads will be stored. It's important to set this collection for form submission, and to use the Media Gallery field type at least once.
To create a collection:
- Go to CMS in your Editor:
- Wix Editor: Click CMS
 on the left of the Editor.
 - Editor X: Click CMS
 at the top of Editor X.
- Wix Editor: Click CMS
- Click Create Collection.
- Enter a name for the collection (this collection will hold the content that visitors enter).
- Click the How many items you want in your collection? drop-down and select Multiple items (Default).
- Click Create.
- In your new collection, use the Media Gallery field type for at least one field

- Close your collection.
Step 2 | Add an Upload Button and a dataset
You can add an Upload Button and a linked dataset at the same time. It's easier to keep track of the collection you created in step 1 by adding the dataset in this step.
New datasets experience:
In Wix Studio, we've moved datasets to the Inspector panel on the right to make them easier for you to use. Learn more about the new datasets experience in Wix Studio.
To add an Upload Button and a dataset:
- Go to the Add panel:
- Wix Editor: Click Add on the left side of the Editor.
- Editor X: Click Add Elements at the top of Editor X.
- Click Input.
- Click Upload Buttons.
- Select a button and drag it onto the page.
- Click the Upload Button, then click the Connect to Data icon
 (or
(or  in Editor X).

- Create a dataset.
- Click Create Dataset.
Note: If your site already has a dataset, click the Connect a dataset drop-down and select Create a New Dataset. - Click the Choose a collection drop-down and select the collection you created in step 1.
- (Optional) Edit the name of the dataset.
- Click Create.
- Click Create Dataset.
- Click the File connects to drop-down and select the Media Gallery field you set up in step 1.
Step 3 | Set up the Upload Button
Setting up the Upload Button correctly is the key to allowing visitors to upload multiple files. If you select Document or Audio as a Supported file type, you will be limited to a single file upload.
To set up the Upload Button:
- Click the Upload Button, then click Settings.
- Click the Supported file type drop-down and select the file type you want the visitor to upload: Image & Video, Image, or Video.
- Set the Max number of files slider to the maximum amount of files you want visitors to be able to upload at a time.
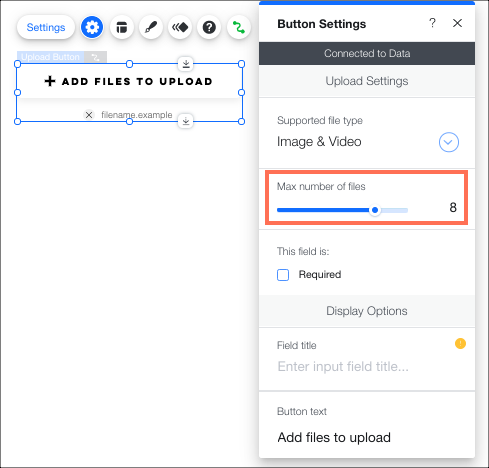
- (Optional) Select the Required checkbox to make this a required field.
- (Optional) Add a Field title (the text that appears above the Upload Button).
- Enter the text that appears on your Upload Button in the Button text field.
- Select an option under Text below button:
- Show file info only: This displays the visitor's selected file name after the file is selected.
- Show custom text: This option allows you to add useful text below the button such as information on the correct file size (e.g., Max file size is 10MB). Once a visitor selects a file, the file name is displayed.
- Click View Uploaded Files to see files that have been uploaded by visitors.
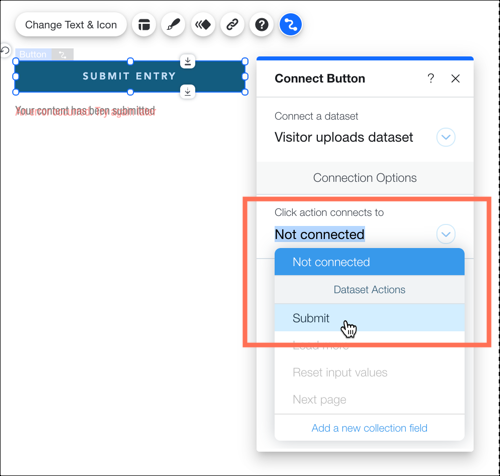
Step 4 | Add a Submit button
The Submit button is what your site visitors click on to upload their selected files to your site. It's good practice to add the optional 'success' and 'failure' messages. You can place these on top of each other on your page, as only one is ever displayed to your site visitor at a time.
To add a Submit button:
- Go to the Add panel:
- Wix Editor: Click Add on the left side of the Editor.
- Editor X: Click Add Elements at the top of Editor X.
- Click Button.
- Select a button and drag it onto the page.
- Click Change Text and change the text to Submit.
- Click the Connect to Data icon (or
 in Editor X).
 - Make sure the dataset you created in step 2 is selected under Connect a dataset.
- Click the Click action connects to drop-down and select Submit.
- (Optional) Add a success message that appears when visitors finish uploading their files:
- Click + Add success message.
- Select the success message in your Editor and edit the message.
- Click and drag the success message to the location where you want it to appear.
- (Optional) Add a failure message that appears if the file fails to upload:
- Select the submit button and click the Connect to Data icon (or in Editor X).
- Click + Add failure message.
- Select the failure message in your Editor and edit the message.
- Click and drag the failure message to the location where you want it to appear.
- Select the submit button and click the Connect to Data icon
- Click the When successful, navigate to drop-down, and select an option:
- Stay on this page: The visitor stays on this page after submitting the form.
- A link: The visitor is redirected to another page after submitting the form. Click Choose under Choose a link and set up the link.
Did this help?
|