CMS: Setting Up a Custom Form Using Dropdown Input Elements
25 min read
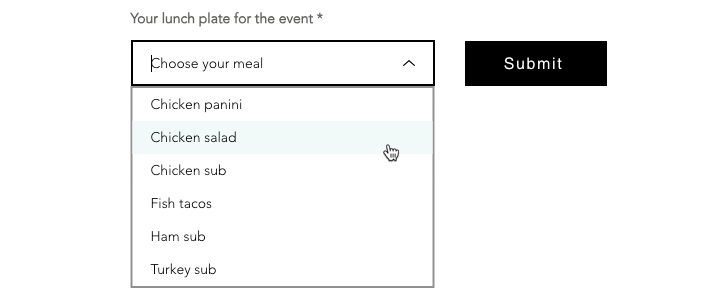
Create custom forms that allow visitors to use dropdown inputs to submit their selections directly to your CMS collections. This article walks you through the process of adding a dropdown input element and a submit button. You will connect both elements to a dataset that allows visitor submissions to be saved in your CMS collection.
After completing these steps, you can expand your form by adding more input elements and connecting them to the same dataset.
Before you begin:
Make sure to add the CMS to your site if you haven't already.
Step 1 | Add the dropdown element
Go to the page in your editor where you want to create a custom form, then add the dropdown element.
Wix Editor
Editor X
Studio Editor
- Go to your editor.
- Go to the page in which you want to add input elements.
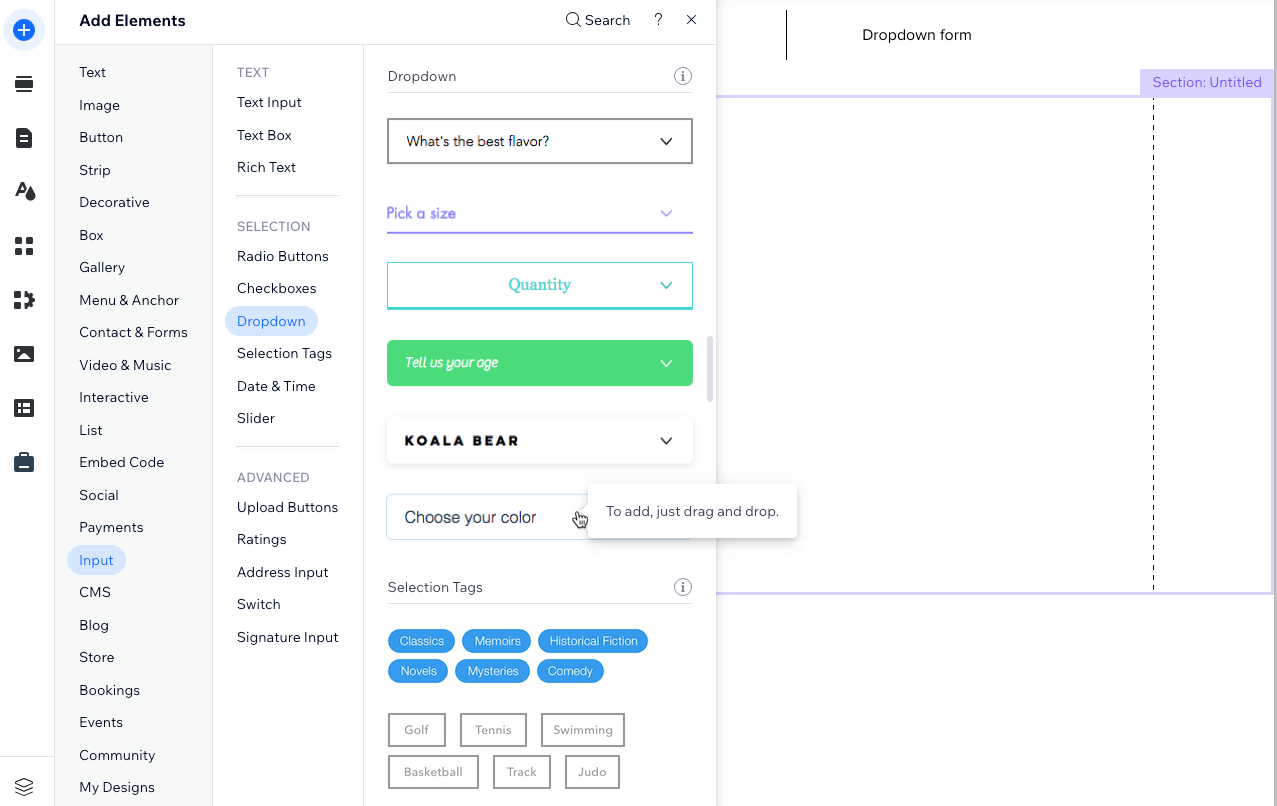
- Click Add Elements
 on the left side of the editor.
 - Click Input.
- Click Dropdown.
- Click and drag the dropdown you want to use onto the page.
Step 2 | Connect to the CMS
Connect your dropdown to a dataset that connects to a CMS collection where you will store the submissions.
For the options that appear in the dropdown list, you can add them manually, or use items from a different CMS collection. To use items from the CMS, connect the dropdown list to a different dataset that connects to a field in another collection.
Wix Editor
Editor X
Studio Editor
- In your editor, click the dropdown element you just added.
- Click the Connect to CMS icon
 .
. - Connect to a dataset that binds to the collection where you will store the submissions:
- If you do not have a dataset on the page:
- Click + Add a Dataset on the right. Then choose the collection to connect, enter the dataset name and click Create.
- Click Collect content.

- If you already have a dataset on the page:
- Click Collect content.
- Click the Choose a dataset drop-down and select the relevant dataset. Alternatively, click Add a Dataset to create a new one, then choose the collection to connect, enter the dataset name and click Create.

- If you do not have a dataset on the page:
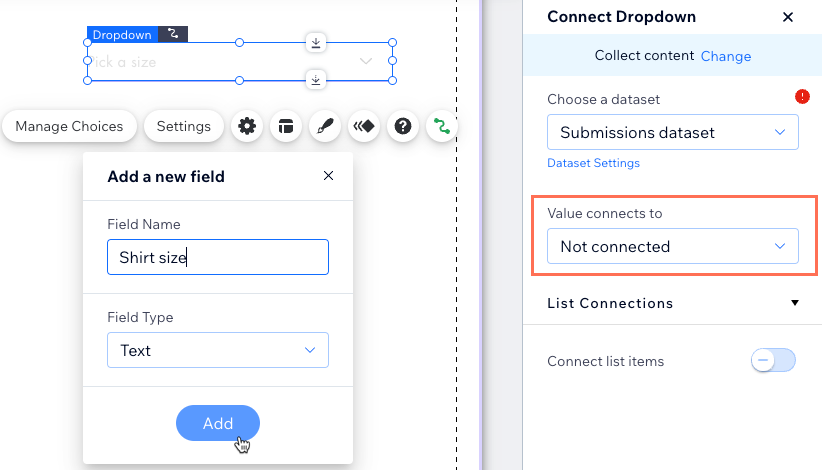
- Click the Value connects to drop-down and select Add new field.
- Enter a Field Name for the new collection field.
- Select the Field Type from the drop-down. The field type determines what kind of data you can store in the field.
- Click Add.
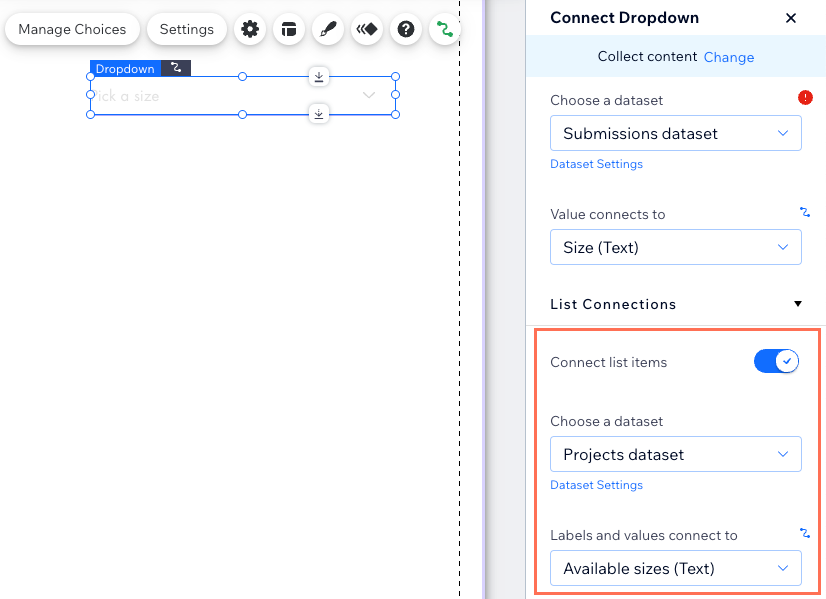
- Click the Connect list items toggle to choose where to manage the element's choices:
- Enabled: Use a field from another CMS collection for the choices. Connect the relevant dataset and choose the fields to use from the Labels and values connect to drop-down.
- Disabled: Click Manage Choices to create the choices for the element separate from the CMS.
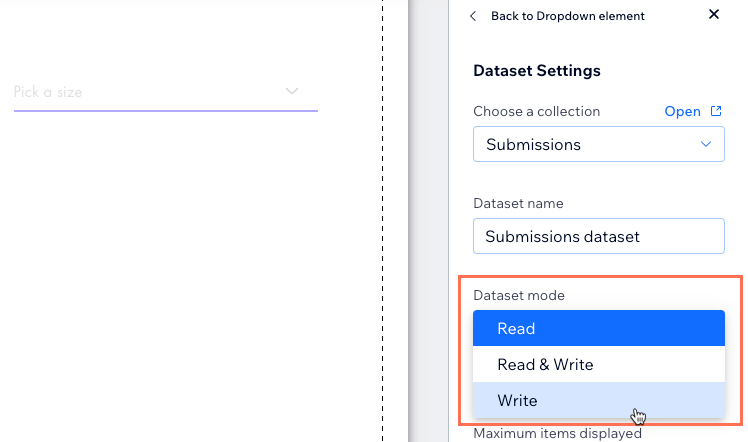
Step 3 | Set the dataset modes
Since datasets control the connection between your collections and page elements, make sure each dataset is in the correct mode. For the dataset connected to your submissions collection, set the mode to Write. This allows the dropdown selections to "write", or add to your collection upon submission.
If you connected the dropdown list items to another collection via a new dataset, the dataset should automatically be set correctly to Read & Write. However, if you connected to an existing dataset, make sure to set it to Read & Write or Read. This allows the dropdown input element to "read", or view the items from the collection so it can use them in the list options.
Wix Editor
Editor X
Studio Editor
- In the panel on the right, click Dataset Settings under the first Choose a dataset drop-down. This dataset connects to the collection you will store the submissions in.
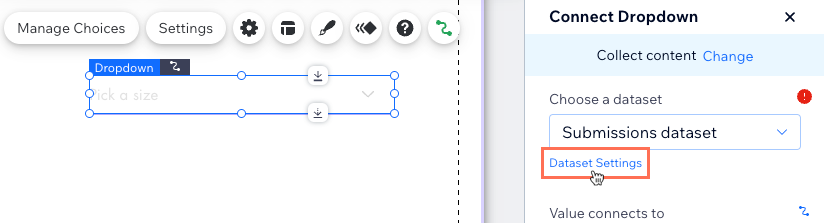
- Click the Dataset mode drop-down and select Write.
- (If you connected list items to the CMS) Set the mode for the dataset connected to the list items:
- Click Back to Dropdown element at the top of the panel.
- Click Dataset Settings under the dataset selected in the List Connections section.
- Click the Dataset mode drop-down and select Read or Read & Write.
- (Optional) Click + Add Filter if you want to create a filter to exclude certain items from appearing in the list of choices.
- (Optional) Click + Add new sort if you want to choose the order in which the items appear in the list of choices.

Step 4 | Set the collection permissions
Set the permissions for the collection where you will store the submissions. You can choose from preset permission settings such as Form Submissions that allow visitors to add content. If needed, you can customize the permissions to control who can add, edit, view, and delete the collection items.
Wix Editor
Editor X
Studio Editor
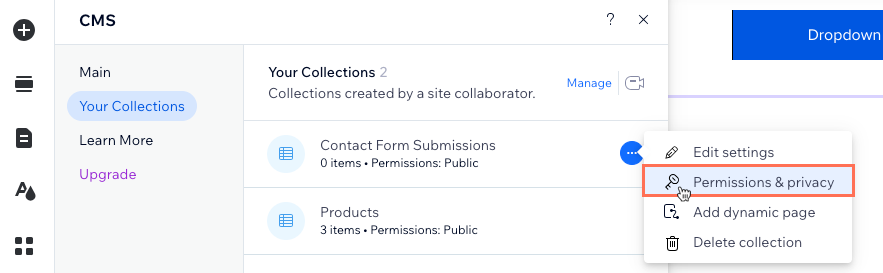
- Click CMS
 on the left of the editor.
 - Click Your Collections.
- Hover over the collection set to collect the submissions and click the More Actions icon
 .
. - Click Permissions & privacy.
- Click the What type of content will you store in this collection? drop-down and select Form submissions. If necessary, you can choose another option and click the drop-downs to adjust who can view, add, delete, and update content. Learn more about setting collection permissions.
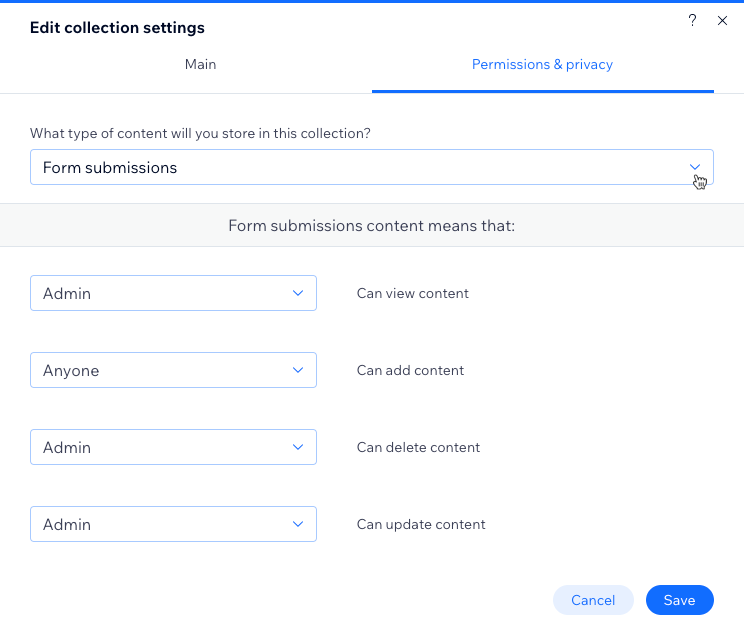
- Click Save.
Step 5 | Create a submit button
You need to create a way for visitors to submit their choices after selecting them from the dropdown element. Add a button or image and connect it to the same dataset that connects to your submissions collection. Then set the click action for the button or image to Submit. This allows the dropdown selection to 'write', or create a new item in the submissions collection upon clicking the submit button.
If you connect other input elements to the same dataset, the submit button also sends their inputs to the collection.
Wix Editor
Editor X
Studio Editor
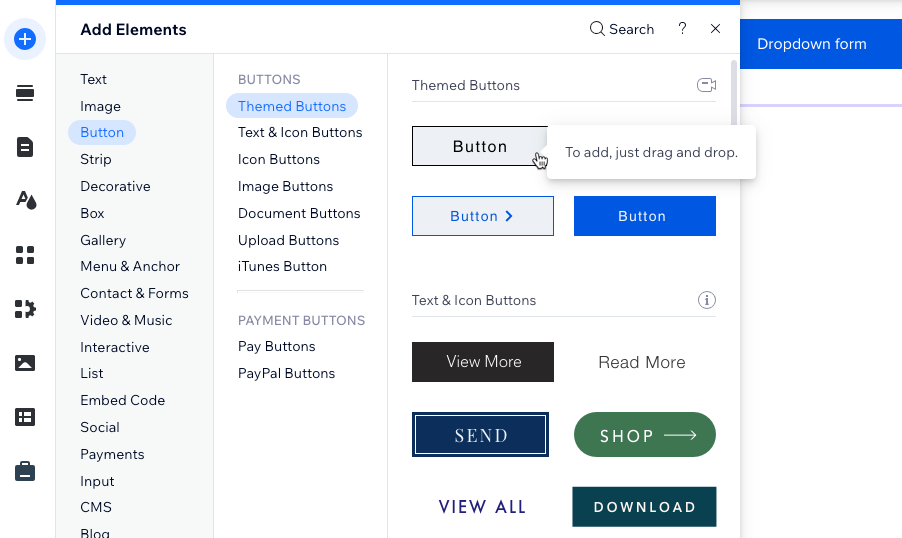
- Click Add Elements on the left side of the editor.
- Click Button.
- Click and drag the button you want to use as your submit button onto the page. You can use any of the following button types: Themed Buttons, Text & Icon Buttons, Icon Buttons, or Image Buttons.
Tip: Alternatively, you can add an image and use it as your submit button.
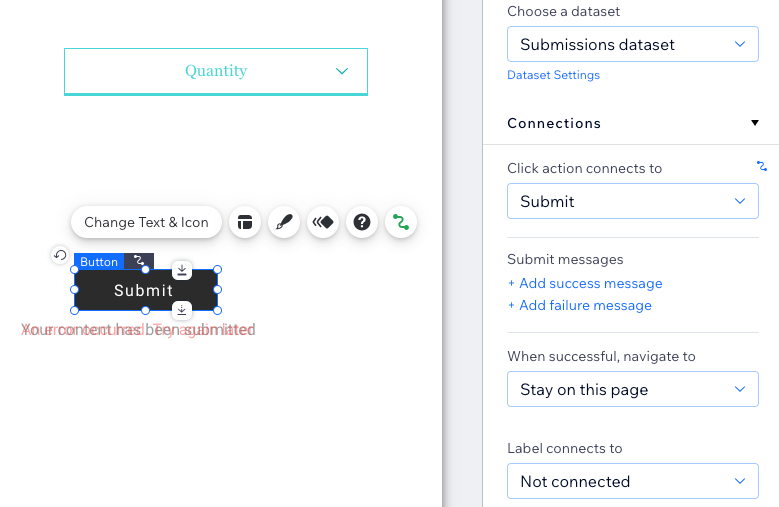
- Click Change Text & Icon and enter the text you want to display on the button (e.g. "Submit").
- Click the Connect to CMS icon .
- Click the Choose a dataset drop-down and select the dataset connected to your submissions collection.
- Click the Click action connects to drop-down and select Submit.
- (Optional) Add success and failure messages that appear when submissions are submitted successfully or unsuccessfully:
- Click + Add success message then click + Add failure message.
- Click and drag both messages to the place where you want them to appear. They can overlap because the messages do not display at the same time.
- Click Edit Text on each message to edit the messages.
- Select the button and click the Connect to CMS icon . Then click the When successful, navigate to drop-down, and select an option:
- Stay on this page: The visitor stays on the same page after submitting the form.
- A link: The visitor is redirected to another page after submitting the form. Click Choose under Choose a link and set up the link.
- Click the button and select the Design icon
 to customize the appearance of your submit button.
Step 6 | Customize the dropdown element
Set the title, placeholder text and other options from the dropdown settings. Customize the element's look and feel from the Design panel and adjust alignment, spacing and padding from the Layout panel.
Wix Editor
Editor X
Studio Editor
- In your editor, click the dropdown element.
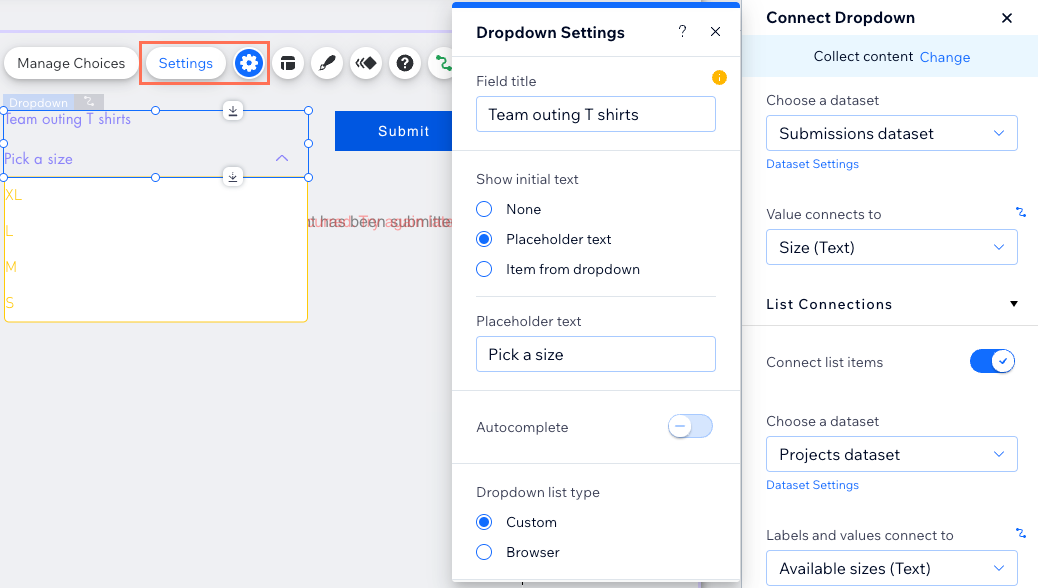
- Click Settings and edit the following:
- Field title: Enter a title that will appear at the top of the dropdown element.
- Show initial text: Choose the initial text visitors see before they click the dropdown element:
- None: Visitors see a blank box before they click the dropdown element.
- Placeholder text: Use your own text on the dropdown element (e.g. "Choose your color"). Enter the text in the Placeholder text field.
- Item from dropdown: Show an item from the dropdown list. If you connected the list to the CMS, the item that appears is the first dropdown choice visitors can select. If you did not connect the list items to the CMS, click the Select an item from your list to choose which item appears.
- Autocomplete: Click the toggle to determine what happens when visitors type to search in the dropdown:
- Enabled: Only choices that match the typed text appear in the dropdown.
- Disabled: All choices appear in the dropdown.
- Dropdown list type: Choose an option:
- Custom: Customize the dropdown element in the Design panel. On mobile, the list type is always set to Browser.
- Browser: Use the browser's default theme on the dropdown element.
- This field is: Select the Required checkbox to require that visitors select an item from this dropdown list before their submission can be submitted.
- Click the Layout icon
 to adjust the text alignment and the element's padding and spacing.
 - Click the Design icon
 to choose a preset design, then select Customize Design to further adjust the appearance of the dropdown element.
 - (Optional) Click the Animation icon
 to add an animation to the dropdown element.
Ready to go live?
Click Preview at the top right of your editor to test out your new custom dropdown form. When everything looks great and works perfectly, click Publish to make the changes go live.
If you've enabled Sandbox, sync your Sandbox collection to the live collection to make the database changes go live.
FAQs
Click a question below for answers to the most common questions about connecting dropdown elements to the CMS.
Can I export the submissions that get saved to my collection?
Can site visitors use input elements to filter the content that appears on my site?
What is the dataset mode, and how does it affect visitor interactions?
What is a dataset?
Where do the list of items come from if I connect my dropdown element to a reference field?
Did this help?
|